Volume Meshes
Volumetric meshes, such as tetrahedral (tet) and hexahedral (hex, cube-like) meshes, represent a region of 3D space. Polyscope can display tet and hex meshes, including those which have a mix of hex and tet elements. We’ll use the term cell to refer generically to a tet or hex in a volume mesh. As always, Polyscope can also handle scalar, color, or vector quantities associated with the vertices or cells of the mesh, and you can click on the mesh elements to inspect values.
Registering a volume mesh
Example: registering a tetrahedral mesh
import polyscope as ps
import numpy as np
import igl

verts, tets, _ = igl.read_mesh("my_mesh.mesh")
ps_vol = ps.register_volume_mesh("test volume mesh", verts, tets=tets)

n_vert = verts.shape[0]
n_cell = tets.shape[0]

# Add a scalar function on vertices
data_vert = np.random.rand(n_vert)
ps_vol.add_scalar_quantity("my vertex val", data_vert)

# you can also access the structure by name
ps.get_volume_mesh("test volume mesh").add_scalar_quantity("my vertex val", data_vert)

# Add a scalar function on cells (with some options set)
data_cell = np.random.rand(n_cell)
ps_vol.add_scalar_quantity("my cell val", data_cell, defined_on='cells',
                           vminmax=(-3., 3.), cmap='blues')

# Show the GUI
ps.show()
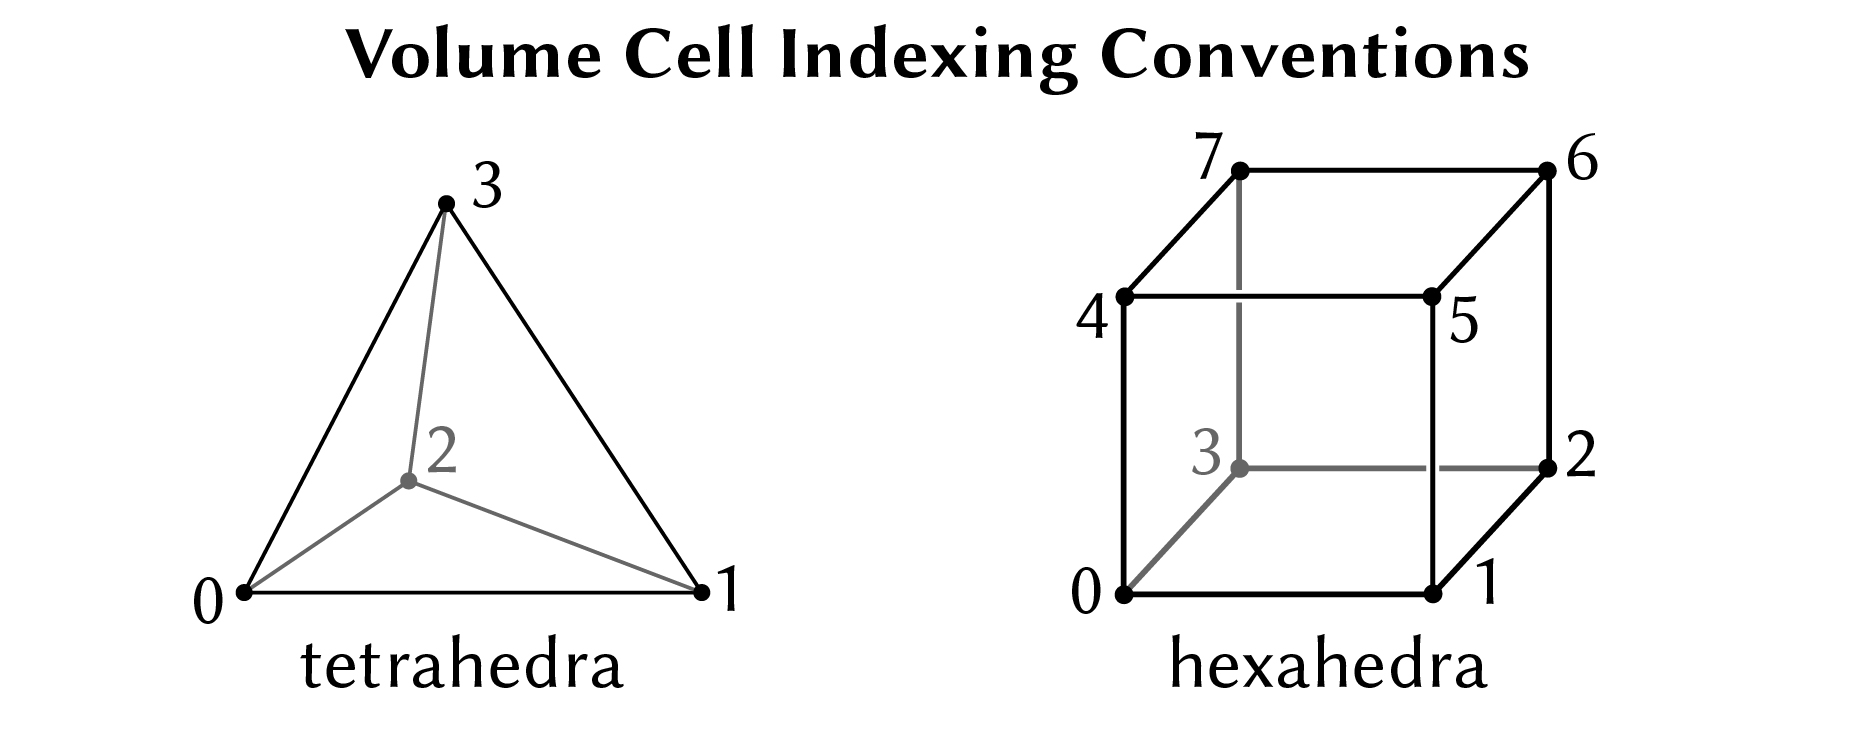
Volume meshes are registered with Polyscope by passing the location of each vertex in the mesh, as well as the vertex indices for each cell. There are a few different argument variants to register meshes with tets, hexes, or a mix of the two.

register_volume_mesh(name, vertices, tets=None, hexes=None, mixed_cells=None, enabled=None, color=None, interior_color=None, edge_color=None, edge_width=None, material=None)
Add a new volume mesh structure to Polyscope.
namestring, a name for the structureverticesanNx3numpy float array of vertex locations
The elements are specified by a combination of the following arguments:
tetsaTx4numpy integer array of tetrahedra, as 0-based indices in to the vertices arrayhexesaHx8numpy integer array of hexahedra, as 0-based indices in to the vertices arraymixed_cellsaMx8numpy integer array which may contain a mix of tetrahedra and hexahedra. For any rows which are tets and thus have just 4 indices, the remaining indices should be set to any negative value.
You may pass in tets, hexes, or both to specify the connectivty. Alternately, mixed_cells may be used. However, it is not supported to specify both tets/hexes and mixed_cells. For the purposes of element ordering, when tets and hexes are both passed, the cells are presumed to be ordered with all tetrahedral cells coming first, then hexahedral cells.
Additional optional keyword arguments:
enabledboolean, is the structure enabled initiallycolorfloat 3-tuple, default color values for the outside of the mesh as rgb in [0,1]interior_colorfloat 3-tuple, default color values for the inside of the mesh as rgb in [0,1]edge_colorfloat 3-tuple, default color values for edges of the mesh as rgb in [0,1] (be sure to setedge_widthtoo)edge_widthfloat, width of edges in rendered mesh; default sets0to disable edges,1is a reasonable value to enablematerialstring, name of material to use for the mesh
if not specified, these optional parameters will assume a reasonable default value, or a persistent value if previously set.
No support for 2D
Unlike other structures, 2D volume meshes are not supported; they don’t make much sense (see 2D data).
Updating a mesh
The locations of the vertices in a mesh can be updated with the member function update_vertex_positions(newPositions). All quantities will be preserved. Changing the connectivity or element counts in a mesh is not supported, you will need to register a new mesh (perhaps with the same name to overwrite).
VolumeMesh.update_vertex_positions(newPos)
Update the vertex positions in a volume mesh structure. newPos must be valid input to initially construct the vertex positions, with the same number of vertices.
Slice planes
Slice planes are particularly useful for inspecting the internal structure of a volume mesh, as shown in the demo video at the top. Slice planes can be manipulated programmatically or manually in the GUI; see the slice plane documentation for more details.
Slice planes have special functionality for volume mesh vertex values—they can inspect quantities on volume meshes and render them on the interior of the volume. See the slice plane documentation for details.
Options
Options control the appearance of the mesh. These options can also be passed as keyword arguments to the initial register_volume_mesh(), as noted above. See structure management for options common to all structures such as enabling/disabling, transforms, and transparency.
| Parameter | Meaning | Getter | Setter | Persistent? |
|---|---|---|---|---|
| color | the color of the outside of the volume | get_color() |
set_color(val) |
yes |
| interior color | the color of the inside of the volume | get_interior_color() |
set_interior_color(val) |
yes |
| edge color | the color of the edges of the mesh | get_edge_color() |
set_edge_color(val) |
yes |
| edge width | how thick to draw mesh edges, use 0. to disable and 1. for reasonable edges |
get_edge_width() |
set_edge_width(val) |
yes |
| material | what material to use | get_material() |
set_material(name) |
yes |
Example: set options which affect the appearance of the mesh
import numpy as np
import polyscope as ps

# a simple inline mesh
verts = np.array([
    [0, 0, 0],
    [1, 0, 0],
    [1, 1, 0],
    [0, 1, 0],
    [0, 0, 1],
    [1, 0, 1],
    [1, 1, 1],
    [0, 1, 1],
    [1, 1, 1.5]
])
cells = np.array([
  [0, 1, 2, 3, 4, 5, 6, 7],
  [7, 5, 6, 8, -1, -1, -1, -1],
])
ps_vol = ps.register_volume_mesh("test volume mesh", verts, mixed_cells=cells)

ps_vol.set_enabled(False) # disable
ps_vol.set_enabled() # default is true

ps_vol.set_color((0.3, 0.6, 0.8)) # rgb triple on [0,1]
ps_vol.set_interior_color((0.4, 0.7, 0.9))
ps_vol.set_edge_color((0.8, 0.8, 0.8))
ps_vol.set_edge_width(1.0)
ps_vol.set_material("wax")
ps_vol.set_transparency(0.5)

# alternately:
ps.register_volume_mesh("test volume mesh 2", verts, mixed_cells=cells, enabled=False,
                         color=(1., 0., 0.), interior_color=(0., 1., 0.),
                         edge_color=((0.8, 0.8, 0.8)), edge_width=1.0,
                         material='candy', transparency=0.5)

ps.show()