Managing Views & Cameras
These functions control the current viewing camera in for the Polyscope scene, as well as more-generally managing camera parameters across visualizations, such as for Camera View structures.
import polyscope as ps
import numpy as np

# change the default up-direction or front-direction for the scene
ps.set_up_dir("z_up")
ps.set_front_dir("neg_y_front")

# change the navigation style (default is Turntable)
ps.set_navigation_style("free")

# get the current camera view matrix
view_mat = ps.get_camera_view_matrix()


# set the current camera view matrix
ps.set_camera_view_matrix(view_mat)

# set the current camera pose to look-at something in the scene
ps.look_at((0., 0., 5.), (1., 1., 1.))
# (alternately, use numpy vectors)
ps.look_at(np.array((0., 0., 5.)), np.array((1., 1., 1.)))

# manipulate the current camera with the CameraParameters object,
# which standardizes all camera information
cam_params = ps.get_view_camera_parameters()
ps.set_view_camera_parameters(cam_params)

# you can even use the parameters to create a camera view structure,
# which visualize views of the scene as a frame and can hold image
# quantities
ps_cam = ps.register_camera_view("cam1", cam_params)
Window Controls
Get and set the size of the window which appears on the user’s display.
set_window_size(width, height)
Set the size of the window.
Note that for some platforms, on high-DPI screens the pixel buffer resolution may be different from the logical size. This is the logical size.
get_window_size()
Get the current size of the window. Returns a (width, height) tuple.
Note that for some platforms, on high-DPI screens the pixel buffer resolution may be different from the logical size. This is the logical size.
get_buffer_size()
Get the current pixel buffer resolution of the window. Returns a (width, height) tuple.
Note that for some platforms, on high-DPI screens the pixel buffer resolution may be different from the logical size. This is the pixel buffer size.
set_window_resizable(is_resizable)
If false, the window will be locked to size and the OS will not allow it to be resized. (Default: true)
There is also a corresponding get_window_resizable().
Manipulating the Current View
These settings affect the 3D camera view in polyscope. It is often convenient to set them just before calling ps.init(), but they may set be anywhere.
View Getters:
# call like ps.get_camera_view_matrix() etc
polyscope.get_view_camera_parameters() # contains all of this info

# (these friendly helpers get the same info as ^^^)
polyscope.get_camera_view_matrix()
polyscope.get_vertical_fov_degrees()
polyscope.get_aspect_ratio_width_over_height()
get_view_camera_parameters()
Get the camera parameters (intrinsic and extrinsics) that describe the current viewport view.
See the section below for additional methods to get values from the camera parameters.
Example:
curr_params = ps.get_view_camera_parameters()

# get some data from the parameters
view_mat = curr_params.get_view_mat()
fov_vert_deg = curr_params.get_fov_vertical_deg()
aspect = curr_params.get_aspect()
pos = curr_params.get_position()
View Setters:
# call like ps.set_camera_view_matrix() etc
polyscope.set_view_camera_parameters(params) # contains all of this info

## (these friendly helpers set the same info as ^^^)
polyscope.set_camera_view_matrix(mat)
polyscope.look_at(camera_location, target, fly_to=False)
polyscope.look_at_dir(camera_location, target, up_dir, fly_to=False)
polyscope.set_vertical_fov_degrees(fov)
# there is no aspect ratio setter: it is determined by the window size
set_view_camera_parameters(params)
Set the camera parameters (intrinsic and extrinsics) that describe the current viewport view.
See the section below for additional methods to construct these camera parameters.
Example:
intrinsics = ps.CameraIntrinsics(fov_vertical_deg=60., aspect=2.)
extrinsics = ps.CameraExtrinsics(root=(2., 2., 2.), look_dir=(-1., 0., 0.), up_dir=(0.,1.,0.))
new_params = ps.CameraParameters(intrinsics, extrinsics)

ps.set_view_camera_parameters(new_params)
Look-At
The look-at functions are particularly easy to use to position the camera towards content of interest.
look_at(camera_location, target, fly_to=False)
Set the camera to be located at the 3D position camera_location and looking at the 3D position target, both in world coordinates. The up direction for the camera is set to be the scene’s up direction. If fly_to=True, the camera will smoothly animate to the new configuration.
The input 3D vectors can be tuples, length-3 numpy arrays, or really anything that can be indexed for three components.
Example:
polyscope.look_at((0., 0., 5.), (1., 1., 1.))
look_at_dir(camera_location, target, up_dir, fly_to=False)
Set the camera to be located at the 3D position camera_location and looking at the 3D position target, oriented with the up direction up_dir, all in world coordinates. If fly_to=True, the camera will smoothly animate to the new configuration.
Note that setting the up direction for the camera view with this function is separate from the scene’s up direction with set_up_dir(), which affects things like ground plane placement, and manual view manipulation.
The input 3D vectors can be tuples, length-3 numpy arrays, or really anything that can be indexed for three components.
Example:
polyscope.look_at_dir((0., 0., 5.), (1., 1., 1.), (-1., -1., 0.))
Home View
The home view is a reasonable default camera view, computed based on the up- and front- direction, as well as the scene extents which may be computed automatically from data you have registered.
By default, the camera is located at the home view when the scene is first opened. You can also return it to that view at any time with reset_camera_to_home_view().
reset_camera_to_home_view()
Reset the camera view to the home view (a reasonable default view scaled to the scene).
Note: The “home” view is dependent on the data in the scene; it is computed from the bounding boxes of all registered structures to ensure that everything is nicely scaled and in view. As such, one should generally call this function after registering data.
Example:
ps.reset_camera_to_home_view()
Navigation Style
The navigation style affects how the user’s mouse interactions navigate the scene. The default is a Turntable rotating around the current canonical Up direction.
Navigation Style Strings:
'turntable'The up direction (see below) is always fixed vertically, with rotation along the azumith and altitude directions.'free'The camera is free to take any orientation, rotation is always about relative to the current camera.'planar'The camera is locked in to a 2D view of the XY plane, with no rotation (see 2D data).
set_navigation_style(s)
The style of the camera navigation. Affects what happens when you drag to rotate around the 3D view with your mouse.
This value can be manually set under the view menu of the ui.
Example:
import polyscope as ps
ps.set_navigation_style("free")
get_navigation_style()
Get the current navigation style (see explanation in the setter above). Returns a string.
Canonical Up and Front
Unfortunately, no one can agree which cartesian direction is “up” in a 3D scene. Polyscope does not assume any particular up direction, it can be configured (default is Y-up).
This effects many defaults of the scene, such as how the camera is oriented and where the ground plane is placed.
set_up_dir(s)
Set the default “up” direction for the scene. This setting affects default orientation of the view, the behavior of some navigation styles (esp. Turntable), and the orientation of the ground plane.
This value can be manually set under the view menu of the ui. Programmatically, the setting strings are:
'x_up'The positive X-axis is up.'neg_x_up'The negative X-axis is up.'y_up'The positive Y-axis is up.'neg_y_up'The negative Y-axis is up.'z_up'The positive Z-axis is up.'neg_z_up'The negative Z-axis is up.
Default: 'y_up'.
Example:
import polyscope as ps
ps.set_up_dir("z_up")
get_up_dir()
Get the current up direction (see explanation in the setter above). Returns a string.
A default front direction can also be configured, which effects the placement of the home camera location.
set_front_dir(s)
Set the default “front” direction for the scene. This setting affects default orientation of the view; the starting camera looks at the front of the data.
This value is interpeted as if the scene were a cube, and you are specifying which face of the cube is the ‘front’. So z_front means the +Z face of the cube is the front face, and thus our camera initially points down the -Z axis to look at it.
This value can be manually set under the view menu of the ui. Programmatically, the setting strings are:
'x_front'The positive X-axis is the front.'neg_x_front'The negative X-axis is the front.'y_front'The positive Y-axis is the front.'neg_y_front'The negative Y-axis is the front.'z_front'The positive Z-axis is the front.'neg_z_front'The negative Z-axis is the front.
Default: z_front.
Example:
import polyscope as ps
ps.set_front_dir("z_front")
get_front_dir()
Get the current front direction (see explanation in the setter above). Returns a string.
Perspective and Orthographic Views
By default, Polyscope’s view uses perspective projection. Perspective projections roughly correspond to how images are usually perceived by our eyes and cameras.
Alternately orthographic projection is also supported. Orthographic projections are common in engineering and architecture, because they have the property that distances are preserved in the projected image, regardless of whether the object is near or far from the camera.
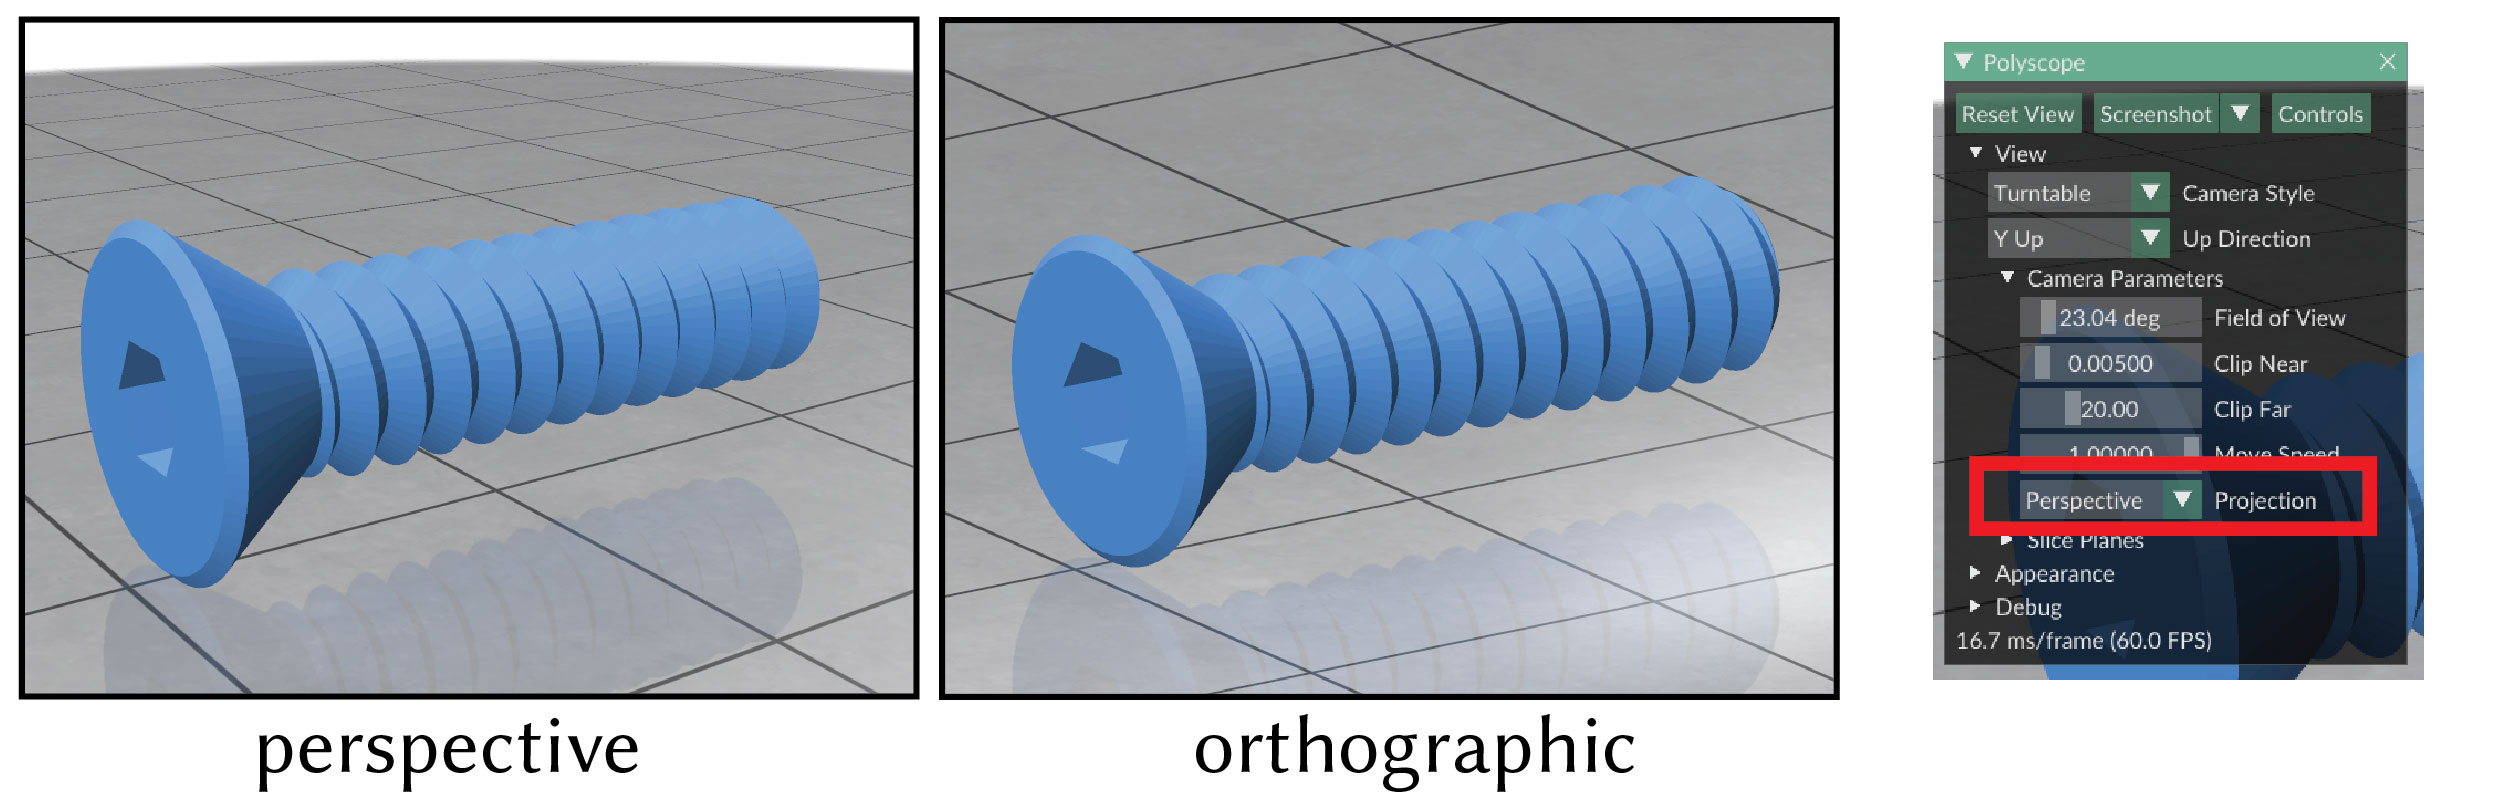
In perspective mode, zooming (for instance, by manually scrolling the mouse) translates the camera forward in space. In orthographic mode, it instead adjusts the field of view without moving the camera. This is because counter-intuitively, translating the camera forward does not actually change the view in an orthographic projection!
set_view_projection_mode(mode_name)
Set the camera view projection to be either orthographic or perspective (default).
Example:
# Enable the orthographic view
ps.set_view_projection_mode("orthographic")

# Go back to default perspective projection
ps.set_view_projection_mode("perspective")
Centering the View on Scene Content
To focus on particular areas of interest, double-click on the scene OR hold ctrl+shift (cmd+shift on macOS) and click in the scene. This will re-center the view in the clicked location. You can also hold ctrl+shift (cmd+shift on macOS) and scroll to zoom relative to selected center location, which makes it easer to zoom in on small details. Use the Reset View button to reset the center of interest.
set_view_center(new_center, fly_to=False)
Programmatically set the view center to a location in world-space. For example, with the Turntable view, this changes the center of rotation.
new_centera 3d vector position in world space as the new centerfly_toa boolean indicating whether to animate the update
The input 3D vector can be tuples, length-3 numpy arrays, or really anything that can be indexed for three components.
For some view types, the view must immediately be projected to conform to the new center. If fly_to=True this projection will be a smooth flight, otherwise it will be instantaneous.
There is also a corresponding get_view_center() returning a vector.
Saving/Restoring Views
The current camera view (location, direction, camera parameters, and window size) can be saved or loaded from a json string. This is useful for quickly setting up repeatable visualizations.
Also, in the Polyscope GUI, this string can be copied to the clipboard at any time via the “copy” hotkey (ctrl-C or cmd-C), or loaded from your current clipboard using the “paste” hotkey (ctrl-V or cmd-V).
get_view_as_json()
Get the current view parameters specified as a json string. Returns a string.
Example:
import polyscope as ps
my_str = ps.get_view_as_json()
void set_view_from_json(json_str)
Set the current view to match the parameters specified in the json string.
Example:
ps.set_view_from_json(my_str);
Camera Parameters Objects
CameraParameters objects describe a camera view in Polyscope, including its intrinsics (the field of view and aspect ratio), and extrinsics (the location and orientation). These parameters are used both for manipulations of the interactive viewport, as well as creating Camera View structures which are visualized as part of the content in your scene.
Example:
import polyscope as ps

# construct camera parameters
intrinsics = ps.CameraIntrinsics(fov_vertical_deg=60., aspect=2.)
extrinsics = ps.CameraExtrinsics(root=(2., 2., 2.), look_dir=(-1., 0., 0.), up_dir=(0.,1.,0.))
params = ps.CameraParameters(intrinsics, extrinsics)

# set the viewport view to those parameters
ps.set_view_camera_parameters(params)

# get the current viewport view
curr_params = ps.get_view_camera_parameters()

# or, use the parameters to create a camera view
cam = ps.register_camera_view("cam1", params)
Camera Intrinsics
A CameraIntrinsics object describes the field of view and aspect ratio of a camera. It does not describe a “pixel resolution” for a camera—you could have many images of different resolutions all associated with the same camera, as long as the aspect ratios are right.
Camera intrinsics can be created by specifying any pair of vertical field of view, horizontal field of view, and aspect ratio.
CameraIntrinsics(fov_vertical_deg=None, fov_horizontal_deg=None, aspect=None)
Construct camera intrinsics. You must specify exactly two of the following parameters
fov_vertical_degvertical field of view in degreesfov_horizontal_deghorizontal field of view in degreesaspectaspect ratio, aswidth / height
Example:
intrinsics = ps.CameraIntrinsics(fov_vertical_deg=60., aspect=2.)
Camera Extrinsics
A CameraExtrinsics object describes the location and orientation of a camera. It can be defined by the forward/up/right axes of the camera in world coordinates, or via an extrinsic matrix, typically denoted E, which maps points in world coordinates to points in the camera’s local coordinate system. Polyscope uses openGL conventions for camera space, such that the camera points toward the -Z axis, with +Y pointing up and +X pointing right.
Camera extrinsics can be created by specifying frame axes or an extrinsic matrix.
CameraExtrinsics(root=None, look_dir=None, up_dir=None, mat=None)
Construct camera extrinsics.
You must specify either all three of:
rootthe world-space position of the cameralook_dira world-space unit vector along which the camera looksup_dira world-space unit vector defining the up axis for the camera
Or specify:
- mat a 4x4 matrix mapping points in world-space to local camera space. Polyscope’s camera space uses openGL convention.
All vectors and matrices should be numpy arrays, or something which a numpy array can be constructed from (like a tuple of floats).
Example:
extrinsics = ps.CameraExtrinsics(root=(2., 2., 2.), look_dir=(-1., 0., 0.), up_dir=(0.,1.,0.))
Camera Parameters
The CameraParameters object combines a set of intrinsics and extrinsics to fully define a camera.
CameraParameters(intrinsics, extrinsics)
Construct camera parameters from intrinsics and extrinsics.
Example:
intrinsics = ps.CameraIntrinsics(fov_vertical_deg=60., aspect=2.)
extrinsics = ps.CameraExtrinsics(root=(2., 2., 2.), look_dir=(-1., 0., 0.), up_dir=(0.,1.,0.))
params = ps.CameraParameters(intrinsics, extrinsics)
Various getters access the intrinsic and extrinsic properties of the parameters object.
# intrinsics
CameraParameters.get_fov_vertical_deg()
CameraParameters.get_aspect()

# extrinsics
CameraParameters.get_T()
CameraParameters.get_R()
CameraParameters.get_view_mat()     # synonym for get_E()
CameraParameters.get_E()
CameraParameters.get_position()
CameraParameters.get_look_dir()
CameraParameters.get_up_dir()
CameraParameters.get_right_dir()
CameraParameters.get_camera_frame() # <look, up, right> world-space vectors
Generating pixel rays
It is often necessary to generate the world-space ray corresponding to each pixel of an image in a camera view. The base point for these rays is easy, it is just params.get_position(). However the ray directions vary-per pixel; the CameraParameters object has two helpers to automatically construct these rays.
CameraParameters.generate_camera_rays(dims, image_origin='upper_left')
Generate an array of rays corresponding to an image with the given resolution dims=(w,h). The result is a [h,w,3] numpy buffer. Ray origins are all implicitly given by params.get_position().
Example:
rays = params.generate_camera_rays((300,200))
CameraParameters.generate_camera_ray_corners()
Generate the rays corresponding to the [upperleft, upperright, lowerleft, lowerright] corners of the camera’s view.
This method is useful because the caller can easily linearly interpolate the normalize get ray directions for all pixels in an image, but this method just needs to return a small amount of data. This makes it easy to e.g. generate rays for a real-time renderer on a GPU, without transferring a whole buffer of ray directions for each frame.