Callbacks & Custom UIs
When polyscope.show() has been called, Polyscope will optionally invoke user-supplied callback function as each frame of the interface is redrawn. This callback can be used to build a program-specific GUI, update an animation, perform computation, etc.
Setting a per-frame callback
Pass in a Python function (with no arguments and no return value), and Polyscope will execute it as each frame of the interface is drawn.
Example:
import polyscope as ps

ps.init()

def callback():
    # Executed every frame
    # Do computation here, define custom UIs, etc.
    print("executing callback")

ps.set_user_callback(callback)

ps.show()

ps.clear_user_callback()
set_user_callback(func)
set_user_callback
Set a function which will be called by polyscope on every UI draw iteration. The argument should be a Python function, which takes no arguments.
clear_user_callback()
clear_user_callback
Clear the callback function.
Creating custom UIs
One of the most important uses of the per-frame callback is to define custom UIs. You can use these UIs to add buttons which execute custom functions, adjust the value of parameters, display information, etc.
Polyscope uses Dear ImGui as an immediate-mode UI framework. Please see the documentation there to understand the basic paradigm and capabilities. The Polyscope python package includes bindings to a significant subset of ImGui in the polyscope.imgui submodule.
These bindings are not yet exhaustively documented, but they follow the naming conventions of ImGui as closely as possible for simplicity. Documentation of ImGui functions and parameters lives here, and you can find the list of bound functions, types, and enums here. Common usage should be covered by the example below.
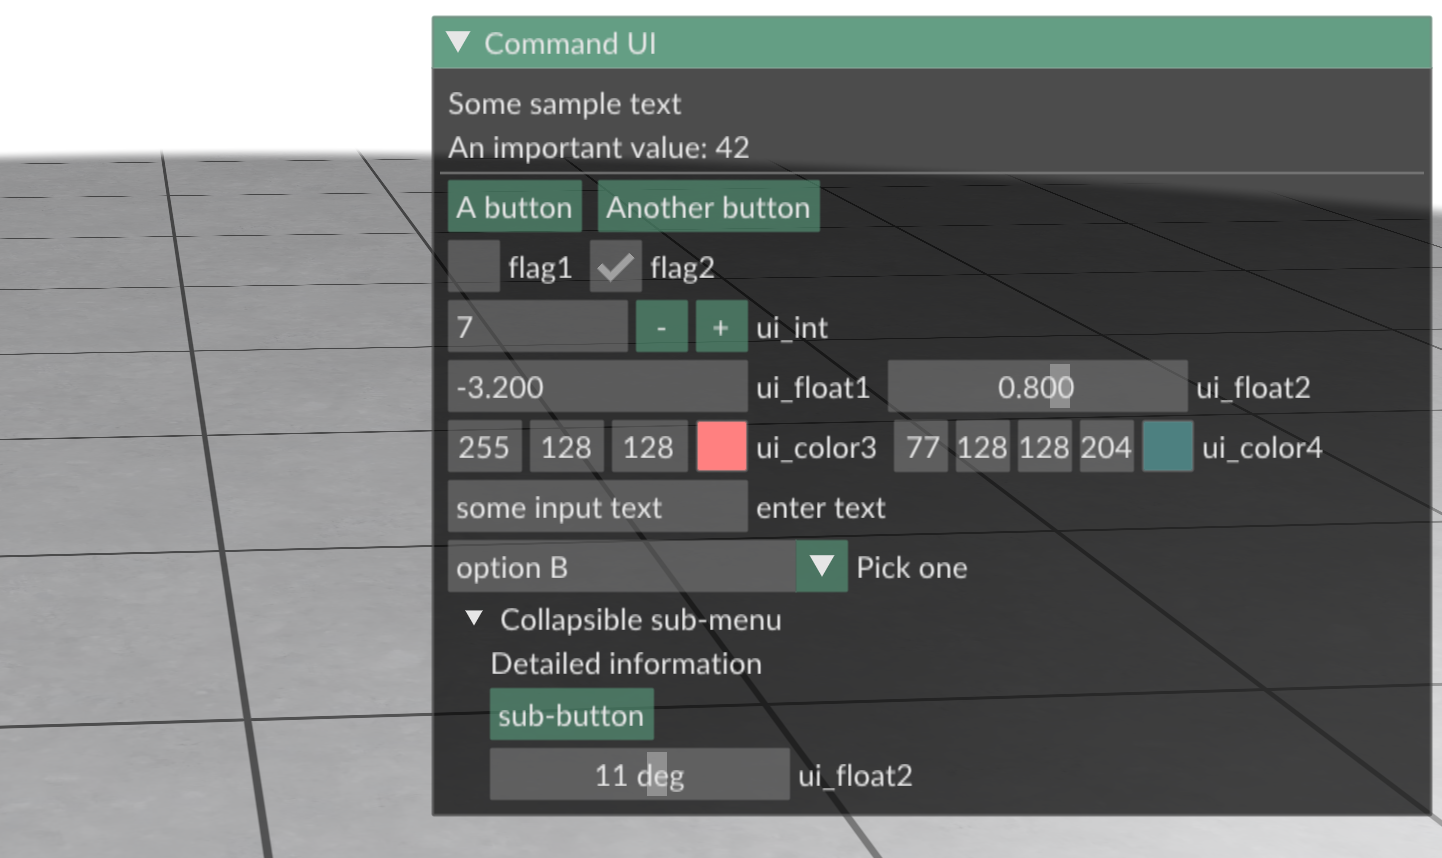
Example: Create the following UI in a Python callback
import polyscope as ps
import polyscope.imgui as psim

# A bunch of parameters which we will manipulate via the UI defined below.
# There is nothing special about these variables, you could manipulate any other
# kind of Python values the same way, such as entries in a dict, or class members.
is_true1 = False
is_true2 = True
ui_int = 7
ui_float1 = -3.2
ui_float2 = 0.8
ui_color3 = (1., 0.5, 0.5)
ui_color4 = (0.3, 0.5, 0.5, 0.8)
ui_angle_rad = 0.2
ui_text = "some input text"
ui_options = ["option A", "option B", "option C"]
ui_options_selected = ui_options[1]

def my_function():
    # ... do something important here ...
    print("executing function")

# Define our callback function, which Polyscope will repeatedly execute while running the UI.
# We can write any code we want here, but in particular it is an opportunity to create ImGui
# interface elements and define a custom UI.
def callback():

    # If we want to use local variables & assign to them in the UI code below,
    # we need to mark them as nonlocal. This is because of how Python scoping
    # rules work, not anything particular about Polyscope or ImGui.
    # Of course, you can also use any other kind of python variable as a controllable
    # value in the UI, such as a value from a dictionary, or a class member. Just be
    # sure to assign the result of the ImGui call to the value, as in the examples below.
    #
    # If these variables are defined at the top level of a Python script file (i.e., not
    # inside any method), you will need to use the `global` keyword instead of `nonlocal`.
    nonlocal is_true1, is_true2, ui_int, ui_float1, ui_float2, ui_color3, ui_color4, ui_text, ui_options_selected, ui_angle_rad


    # == Settings

    # Use settings like this to change the UI appearance.
    # Note that it is a push/pop pair, with the matching pop() below.
    psim.PushItemWidth(150)


    # == Show text in the UI

    psim.TextUnformatted("Some sample text")
    psim.TextUnformatted("An important value: {}".format(42))
    psim.Separator()


    # == Buttons

    if(psim.Button("A button")):
        # This code is executed when the button is pressed
        print("Hello")

    # By default, each element goes on a new line. Use this
    # to put the next element on the _same_ line.
    psim.SameLine()

    if(psim.Button("Another button")):
        # This code is executed when the button is pressed
        my_function()


    # == Set parameters

    # These commands allow the user to adjust the value of variables.
    # It is important that we assign the return result to the variable to
    # update it.
    # For most elements, the return is actually a tuple `(changed, newval)`,
    # where `changed` indicates whether the setting was modified on this
    # frame, and `newval` gives the new value of the variable (or the same
    # old value if unchanged).
    #
    # For numeric inputs, ctrl-click on the box to type in a value.

    # Checkbox
    changed, is_true1 = psim.Checkbox("flag1", is_true1)
    if(changed): # optionally, use this conditional to take action on the new value
        pass
    psim.SameLine()
    changed, is_true2 = psim.Checkbox("flag2", is_true2)

    # Input ints
    changed, ui_int = psim.InputInt("ui_int", ui_int, step=1, step_fast=10)

    # Input floats using two different styles of widget
    changed, ui_float1 = psim.InputFloat("ui_float1", ui_float1)
    psim.SameLine()
    changed, ui_float2 = psim.SliderFloat("ui_float2", ui_float2, v_min=-5, v_max=5)

    # Input colors
    changed, ui_color3 = psim.ColorEdit3("ui_color3", ui_color3)
    psim.SameLine()
    changed, ui_color4 = psim.ColorEdit4("ui_color4", ui_color4)

    # Input text
    changed, ui_text = psim.InputText("enter text", ui_text)

    # Combo box to choose from options
    # There, the options are a list of strings in `ui_options`,
    # and the currently selected element is stored in `ui_options_selected`.
    psim.PushItemWidth(200)
    changed = psim.BeginCombo("Pick one", ui_options_selected)
    if changed:
        for val in ui_options:
            _, selected = psim.Selectable(val, ui_options_selected==val)
            if selected:
                ui_options_selected = val
        psim.EndCombo()
    psim.PopItemWidth()


    # Use tree headers to logically group options

    # This a stateful option to set the tree node below to be open initially.
    # The second argument is a flag, which works like a bitmask.
    # Many ImGui elements accept flags to modify their behavior.
    psim.SetNextItemOpen(True, psim.ImGuiCond_FirstUseEver)

    # The body is executed only when the sub-menu is open. Note the push/pop pair!
    if(psim.TreeNode("Collapsible sub-menu")):

        psim.TextUnformatted("Detailed information")

        if(psim.Button("sub-button")):
            print("hello")

        # There are many different UI elements offered by ImGui, many of which
        # are bound in python by Polyscope. See ImGui's documentation in `imgui.h`,
        # or the polyscope bindings in `polyscope/src/cpp/imgui.cpp`.
        changed, ui_angle_rad = psim.SliderAngle("ui_float2", ui_angle_rad,
                v_degrees_min=-90, v_degrees_max=90)

        psim.TreePop()

    psim.PopItemWidth()


ps.init()
ps.set_user_callback(callback)
ps.show()
Options
set_build_gui(b)
build gui
This option can be used to disable all of Polyscope’s ImGui UI elements, which may be useful for advanced applications which wish to build a fully-custom UI on top of Polyscope.
If false, Polyscope will not create any ImGui UIs at all, but will still set up ImGui and invoke its render steps each frame. The allows advanced users to create their own UIs totally from scratch and circumvent the standard Polyscope UIs.
Default: True.
set_open_imgui_window_for_user_callback(b)
open imgui window for user callback
If true, an ImGui window will be created and docked to the side of the UI when the user callback function is invoked. This means you can immediately start making ui calls like polyscope.imgui.Button("do stuff").
If false, no ImGui anything will be pushed on the stack when the callback is invoked, and the user is entirely responsible for making any ImGui calls (or not making any).
Default: True.
set_invoke_user_callback_for_nested_show(b)
invoke user callback for nested show
Suppose you call polyscope.show(), and within your callback, another instance of polyscope.show() is called—this is a nested show.
Depending on the situation, you might or might not want your user callback to continue being executed on each render loop iteration of this nested viewer; this setting exposes the option.
If true, your callback will be executed as normal for every main loop iteration, even in nested show windows.
If false, your callback will only be executed for initial, outermost calls to polyscope.show().
Default: False.
set_give_focus_on_show(b)
give focus on show
If true, the Polyscope window will request focus from the window manager whenever show() is called. If false, the focus state will be left unchanged.
Default: False.
Mouse Interactions
You can implement custom mouse behaviors on clicks and other actions within your per-frame callback function. Generally, you can use the mouse-related functions available via ImGui to implement a wide variety of behaviors.
Example: print a variety of info about a mouse click
import polyscope as ps
import polyscope.imgui as psim

io = psim.GetIO()
if io.MouseClicked[0]:
    screen_coords = io.MousePos
    world_ray = polyscope.screen_coords_to_world_ray(screen_coords)
    world_pos = polyscope.screen_coords_to_world_position(screen_coords)

    print(f"Click coords: {screen_coords}")
    print(f"  world ray: {world_ray}")
    print(f"  world pos: {world_pos}")
screen_coords_to_world_ray(screen_coords)
screen coords to world ray
Convert a click location to a ray in world-space.
screen_coords_to_world_position(screen_coords)
screen coords to world position
Convert a click location to a location in world-space, by reading from the scene’s depth buffer.